
Q: What flight simulation accessories is the Volair Sim™ Cockpit compatible with?
A: The Volair Sim™ Cockpit is fully compatible with many of the Logitech (Saitek), Honeycomb, RealSimGear, Thrustmaster, WINWING, and CH products accessories.
The avionics table is pre-drilled to accept the Logitech Pro Flight Yoke and the Logitech (Saitek) Pro Flight line of flight simulation accessories such as the Radio Panel, the Multi Panel, Switch Panel, etc. There are no holes to drill, just take all of your Logitech components and mount them directly to the yoke table or, if using our Volair Sim Avionics Panel, mount them directly into the panel.
The left and right stick mounts are also pre-drilled to accept a single or dual Logitech Throttle Quadrant(s), Trim Wheel, Logitech X-55, Logitech X-56, Logitech X-52, Logitech X-65, WINWING Orion2 HOTAS (Joystick and Throttle), and Thrustmaster HOTAS Warthog.
The pedal base accepts a wide variety of rudder pedals such as: Logitech, Thrustmaster, VirtualFly (Ruddo), CH Products, and others.
The rudder pedals mount to the pedal base with provided Velcro strips.
Note: the Thrustmaster TPR (Pendular) pedals will fit if you remove the pedal tray and place the pedals directly on the floor as shown here.
The center stick mount that is included is pre-drilled for the Logitech (Saitek) X-52, Logitech X-65, and Thrustmaster HOTAS Warthog, and WINWING Orion2 Joystick base.
Q: What mounting hardware do I need for the Logitech, Thrustmaster, WinWing and Honeycomb gear?
A: In order to mount the Logitech (Saitek) Pro Flight components using the pre-drilled holes on the cockpit, you will need M4x10mm screws (4mmx0.70x10mm long). You will also need nuts to mount the Logitech Panels (Radio, Switch, Multi-Function, etc.). We suggest you get nylon lock-nuts to prevent panels from becoming loose with time. You combine the panels by attaching them together using thumb screws provided with each Logitech Pro Flight panel.
The best option is to mount these to our Volair Sim Avionics Panel which comes with all necessary hardware and does not require any drilling.
Honeycomb’s products do not have provisions for screw-down installation but can be easily mounted using the included micro-suction mechanism or (preferred) dual-sided 3M tape.
Installation of the Thrustmaster WARTHOG or Winwing Orion2 HOTAS is shown in this video. NOTE: WINWING Orion2 HOTAS (Joystick and Throttle) has the same bolt pattern as Thrustmaster HOTAS so this video applies to both products.
Mounting of the controllers to the center plate is as follows:
In order to mount the Logitech G29/G920/G923 steering wheel, shifter, and pedals using the pre-drilled locations, you will need four (4) M6x10mm long machine screws (2 for the wheel and 2 for the shifter), and four (4) M6x16mm screws for the pedals. You can purchase these at any hardware store in the metric fastener section.
Q: Why does Volair Sim Cockpit comes with all mounts and accessories in the standard package and you do not offer them separately?
A: Most manufacturers have a strategy to charge a lower base price for the “bare” cockpit and then charge high premium for extras. We believe that you should not pay premium for accessories that you may need now or in the future.
For instance, some simmers start with single monitor but down the road end up with three monitors for best flying or racing experience. We provide these standard, knowing that sooner or later you will need them. The same goes for the yoke or shifter mounts, keyboard tray (a must for flight sim), and the avionics table which is a must for mounting the flight sim hardware.
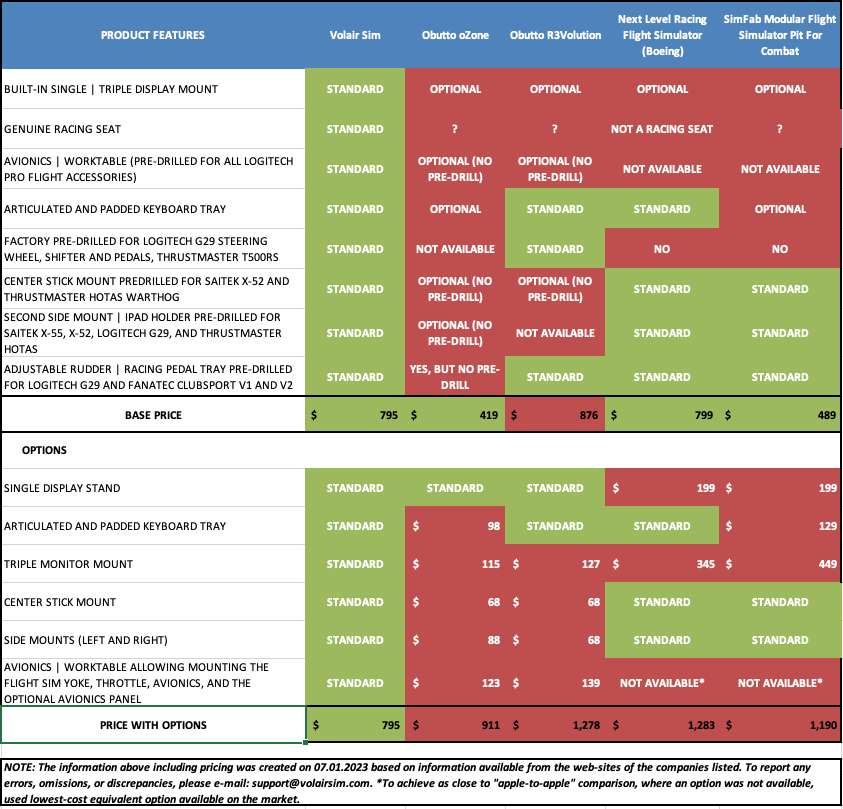
See the following feature comparison vis-a-vis some other brands:
Q: How much will it cost me to assemble the entire flight sim cockpit and where do I get the rest of the components?
A: Building a very capable flight sim suitable for VFR or IFR practicing can be surprisingly affordable with the Volair Sim concept and can be accomplished in phases. One thing to consider is whether to build a conventional (i.e. “steam gauges”) or “glass” (e.g. Garmin G1000) sim. Our products allow you to configure the chassis to do either one.
The second consideration is whether to use yoke or stick for controls (or both). Volair Sim allows you to mount the stick on the left, center, or right with the included mounts. Note: if mounting the stick on the right, consider relocating the keyboard tray to the left for more room using the Left-hand Keyboard Mount (sold separately).
Q: Which locations do you ship to?
A: We currently ship to United States (including AK, and HI), and Canada. Please note that the cost of the shipment is driven by the size and weight of the boxes. We are happy to offer our negotiated lower UPS shipping rates to the customers at check-out to help minimize shipping costs for the customer.
Q: What are the chassis package box sizes and overall dimensions of the cockpit and the Avionics Panel and how much space do I need?
A: The Volair Sim chassis comes in two boxes. The first box measures 37″ x 23″ x 22″ and weighs 68 lbs, while the second box measures 24″ x 22″ x 17″ and weighs 66 lbs. The cockpit itself ideally best fits in a corner of a room and you need about 5′ x 5′ of free space, assuming that you are using the three monitors.
The Avionics Panel dimensions are: 39.5″ x 11″ x 5″. The shipping box size is 44″ x 15″ x 9″ and weights about 20 lbs.
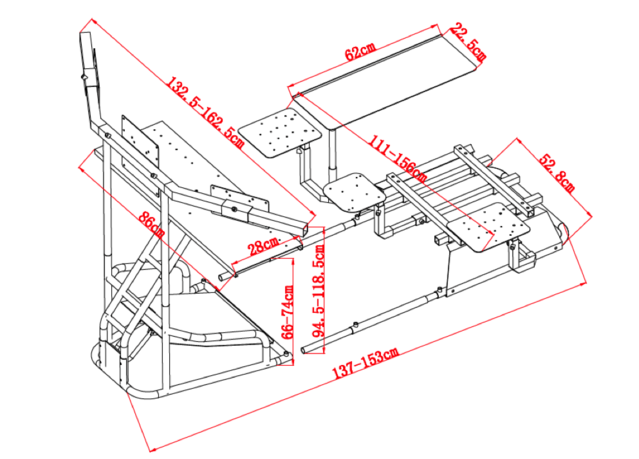
The seat height is 37 cm from the floor (14″). The dimensions for the left and right side seat mounting plates are approximately 8″ (W) x 9″ (L).
The other cockpit base dimensions are as shown below:
Q: What about racing simulation? Which wheel, pedal base, and shifter can I use with Volair Sim? How do I mount them?
A: Volair Sim™ is the world’s first and only universal flight and racing sim chassis that is pre-configured for the Logitech G29/920/G923, as well as the Thrustmaster T500RS racing wheel and pedals which is arguably the most popular and desirable racing wheel for serious racing simmers. Both the work table and the side stick mounts are pre-configured and pre-drilled for the Logitech G29/920/G923 components. The pedal base is also pre-drilled to accept the racing pedal set for permanent installation.
Q: How large of a monitor can I mount on the Volair Sim chassis?
A: You can mount a single 52″ TV or up to three 32” monitors as long as the displays support one of our three VESA bolt patterns. All three monitor mounts are factory pre-drilled for the industry-standard VESA monitor bolt patterns:
If you need to mount displays larger than 32″, we recommend that you purchase our stand-alone Triple Display Stand which will accommodate TVs up-to 50″.
Q: How do I properly align triple displays?
A: In order to get the alignment of the side displays with the center one, first loosen all of the adjustment screws on the monitor arms, monitor brackets, and on the back of the monitor (VESA). Note that in order to get the proper alignment of the side bezels you can move the side monitors on their arms and also slide the monitor left and right arms in and out of the center support. Also, note that the holes on the left and right monitor brackets are slotted so you can rotate the monitors slightly and also move them up/down.
Next, ask a helper to hold the left monitor in perfect position with the center monitor. When satisfied with the position, tighten all of the screws while the helper is holding the monitor in position until you are finished. Next, repeat the process for the right monitor taking care that the angle and bezel spacing of the right monitor is same as the left one. Again, remember you can achieve the right angle and bezel position by independently moving the arm in/out of the center support and also sliding the monitor left and right on the arm.
With little time and patience a seamless positioning can be achieved where the displays are aligned well with the center one and the bezel spacing is minimized and uniform across all three displays.
Q: Can I switch between the flight and racing controllers or do I have to hard-mount the yoke or wheel?
A: You can definitely set-up your cockpit for easy swap between the flight and sim modes. We give you the option for permanent or swappable installation and you should consider purchasing additional Avionics Table/Support and an extra Side Mount from us for easy changes between flight and racing modes.
Q: I am over 6’ tall and a bit on the heavy side. Will I be able to use the cockpit?
A: We have designed the Volair Sim cockpit to accommodate a variety of body frames and heights. The seat base has two adjustable tubes that allow you to shorten or lengthen the entire chassis to accommodate a range of 48″ to 80″ in height. The seat has been designed to accommodate users up to 260 lbs.
Q: What are the warranty terms for Volair Sim products?
A: Volair Sim offers a one-year warranty against defects in materials and workmanship to the original purchaser of Volair Sim products. For details, please see our Terms and Conditions.
Q: Where can I get a replacement for my assembly instructions?
A: Replacement manuals are available for download (PDF) on our Support page.